
When using an arduino as an acquisition and control board for a computer, the very first thing to do is to establish a communication between the Arduino (the server) and the computer (the client). Serial communication via USB is the simplest choice, and in this post we will see how to transform an Arduino into a basic serial server with just a simple - yet powerful - sketch.
This approach has two very important assets:
It works equally well with all Arduino boards (and equivalent boards).
The client can be written in any language (provided that it allows for serial connections, but this is a very common feature)
The serial server
For test purposes, let's use the classical "Hello world" Arduino setup: a single LED connected to the digital pin number 13:

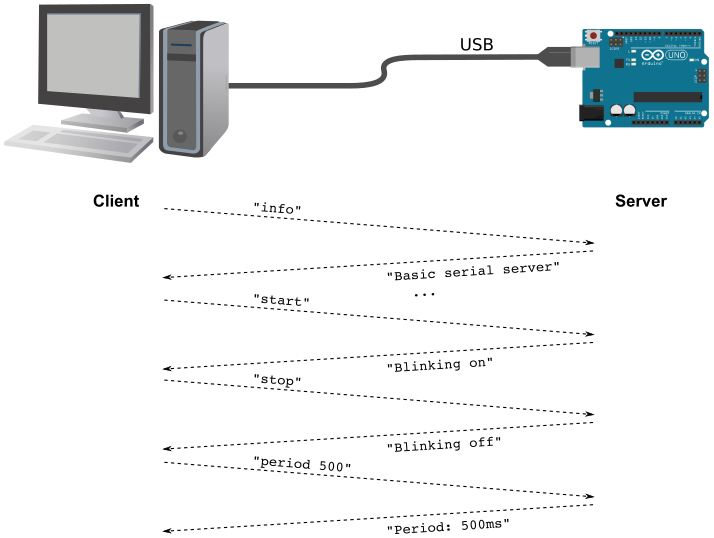
Now, we want to control the LED behavior with some serial commands. For instance, we want to be able to start/stop the blinking or to set the blinking period. Here is a scheme of what the serial server will do:
The Arduino sketch
Open the Arduino IDE and create the following sketch:
// Basic Arduino server

// === Definitions =================================================

int pLED = 13;
int period = 200;
boolean blinking = false;

// === Setup =======================================================

void setup() {

  // --- Pin setup
  pinMode(pLED, OUTPUT);
  digitalWrite(pLED, LOW);

  // --- Serial communication
  Serial.begin(115200);
  Serial.setTimeout(5);

}

// === Main loop ===================================================

void loop() {

  // --- Manage inputs ---------------------------------------------

  if (Serial.available()) {

    String input = Serial.readString();
    input.trim();

    // --- Get information
    if (input.equals("info")) {

      Serial.println("----------------------------");
      Serial.println("Basic serial server");
      Serial.println("Period: " + String(period) + " ms");
      if (blinking) { Serial.println("Blinking: on"); } else { Serial.println("Blinking: off"); }
      Serial.println("----------------------------");

    // --- Start blinking
    } else if (input.equals("start")) {

      blinking = true;
      Serial.println("Blinking on");

    // --- Stop blinking
    } else if (input.equals("stop")) {

      blinking = false;
      Serial.println("Blinking off");

    // --- Set blinking period
    } else if (input.substring(0,6).equals("period")) {

      period = input.substring(7).toInt();
      Serial.println("Period: " + String(period) + " ms");

    }
  }

  // --- Actions ---------------------------------------------------

  if (blinking) {

    digitalWrite(pLED, HIGH);
    delay(period/2);

    digitalWrite(pLED, LOW);
    delay(period/2);

  } else {

    // Turn the LED off
    digitalWrite(pLED, LOW);

  }

}
After upload, your server is ready to use ! To check that the server is indeed running fine, open the serial console (Ctrl+Shift+M), select the correct Baud rate (115200) and type
----------------------------
Basic serial server
Period: 200 ms
Blinking: off
----------------------------
Then type
period 500
start
Now the LED blinks at 2Hz. Unleash your imagination to customize this server for doing whatever your awesome project requires !
Building clients
Playing around with the serial console is nice, but the cool thing is that we can talk to this server in any language. The only restriction is that the language should allow for serial connections, but this is a basic feature that one can find in all mainstream languages. In the sequel I will show a basic Matlab client.
Matlab client
In Matlab, you can check the available connections with the command:
instrhwinfo('serial') Here is the client Matlab code:
% --- Open serial connection
s = serial('/dev/ttyACM0'); 		% Replace with your actual serial port
set(s,'BaudRate', 115200);
fopen(s);
fprintf('The serial connection is established.\n');

% --- Display client commands
fprintf('%s\n', repmat('-', [1 50]));
fprintf('   BASIC SERIAL CLIENT\n\n');
fprintf('Possible commands:\n');
fprintf('\t- info:      Get information from the device.\n');
fprintf('\t- start:     Start LED blinking.\n');
fprintf('\t- stop:      Stop LED blinking.\n');
fprintf('\t- period p:  Change period (milliseconds).\n');
fprintf('%s\n\n', repmat('-', [1 50]));
fprintf('Enter the serial commands below ([Enter] to exit):\n');

while true

    in = input('?> ', 's');

    % Break condition
    if isempty(in), break; end

    % Send command
    fprintf(s, in);

    % Receive message
    while true
        fprintf('%s\n', strtrim(fscanf(s)));
        if ~s.BytesAvailable, break; end
    end

end

% --- Close the serial connection
fclose(s)
delete(s)
clear s

fprintf('The serial connection is closed.\n');
Comments
No comments on this post so far.

Leave a comment